Software setup \ Uploading a new program
Step 1
Download and Install the FTDI USB VCP drivers for your platform (Windows, Linux, Mac OS X Intel, Mac OS X PowerPC). These drivers allow your PC to communicate with the Wiring hardware. For Windows users only: download the setup exuctable (easier setup) just click on it and follow the isntructions. If you downloaded the compressed .zip version it will be necessary to extract the drivers' .zip file contents to a directory in your machine, then plug the Wiring hardware to the USB and when Windows asks for the drivers for the new device, point to the directory where the files were previously unpacked. This procedure will be asked twice, first time for the USB driver, second time for the new serial port. In both cases point to the same directory for the drivers.
Step 2
Download and install the Wiring development environment.
Step 3
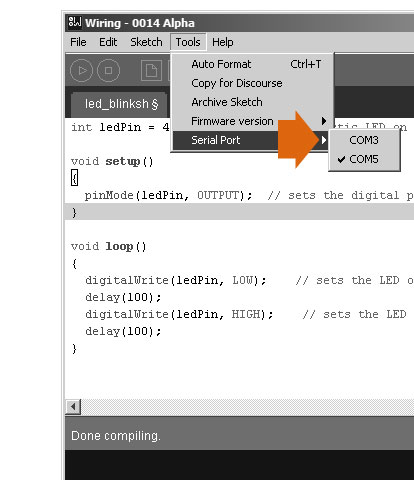
Serial Port Setup. Launch the Wiring development environment. In the Tools menu there is an option named Serial port, inside there is a list of the serial ports available. If everything went fine with the drivers' installation there should be a port for the I/O board. For Windows it appears as COMx where x could be 1,2,3,... etc. For Mac OSX ports appear as /dev/cu.usbserial-xx where xx is a number as well. Select the appropriate one and now you'll be able to upload any code into the board. Íf you don´t know which one corresponds with your board try to unplug the board, check the menu (now there should be a missing port in the menu), plug the board back and check the menu (the board port will appear). Once the port is selected it will be the default port for the I/O board. The port will not change within restarts in the Wiring development environment, unless you connect the board to a different USB port on the PC, in this case the port number may change.
Note: This step needs to be repeated when the Wiring hardware is connected to a different USB port, or changing or connecting a different board.
Step 4
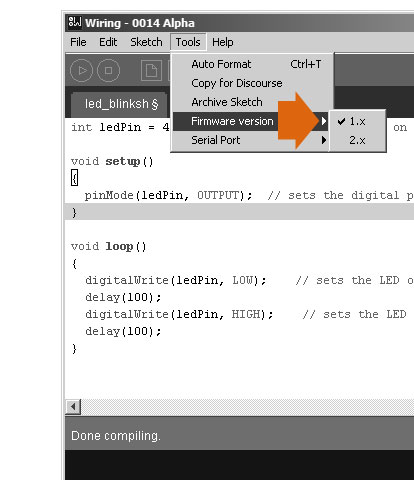
Wiring hardware firmware version select. In the Tools menu there is an option named Firmware version, inside there is a list including version 1.x (default) and version 2.x. Select the proper firmware version for your board. If your board was acquired after February 15th 2008 the firmware version will be 2.x.
Note: the firmware refers to the bootloader software that resides in a special section of the wiring hardware. It receives and stores a program into the microcontroller´s memory every time a new program is uploaded. It is not related to any hardware features, performance or capabilities of the board. The change in the firmware version corresponds to a change in the communication protocol used by ATMEL to upload new programs into their microcontrollers. It is possible to upgrade the bootloader firmware of a board, details will be published soon.