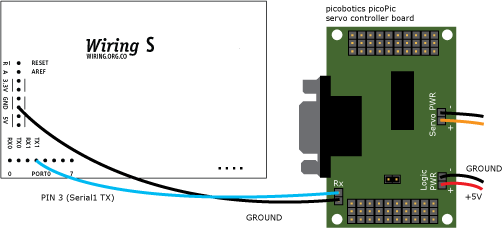
This example is for Wiring version 1.0 build 0100+. If you have a previous version, use the examples included with your software. If you see any errors or have comments, please let us know.
Driving a Picobotics PicoPic Servo controller board http://www.picobotics.com/Products.html by Byoungil Choi & BARRAGAN http://barraganstudio.com
Demonstrates the use of the PicoPic Servo Controller board.

Demonstrates the use of the PicoPic Servo Controller board.

int Address = 120;  // Default PicoPic board address
int PortNum = 10;   // Use servo connected to port 10
int Position = 1000;    // Position 1
int HPos;
int LPos;
int Position2 = 2000;   // Position 2
int HPos2;
int LPos2;
int Speed = 10;   // Slow speed to see results

//1000 = 03E8, 2000 = 07D0

void setup()
{
  Serial.begin(9600);
  Serial1.begin(9600);
  HPos = Position / 256;   // get the high part of the position 1
  LPos = Position % 256;   // get the lower part of the position 1
  HPos2 = Position2 / 256; // get the hight part of the position 2
  LPos2 = Position2 % 256; // get the lower part of the position 2
  pinMode(WLED, OUTPUT);   // Turn ON Wiring board LED
  digitalWrite(WLED, HIGH);
}

void loop()
{
  Serial1.write(Address); // Set the servo number 10 to position 1
  Serial1.write(PortNum);
  Serial1.write(HPos);
  Serial1.write(LPos);
  Serial1.write(Speed);
  delay(5000); // Wait 5 seconds to see the change
  Serial1.write(Address); // Set the servo number 10 to position 2
  Serial1.write(PortNum);
  Serial1.write(HPos2);
  Serial1.write(LPos2);
  Serial1.write(Speed);
  delay(5000);
}


