Installing the Wiring development environment
Step 1
Install the FTDI USB VCP drivers for your platform. For the Windows (.exe) package those are installed automatically. For Windows (.zip) and Mac OS X (.dmg) packages th drivers are included in the drivers folder. These drivers allow your computer to recognize and communicate with the Wiring hardware. Restart your computer after install. The drivers can also be downloaded from the links below:
Drivers for Windows: FTDI VCP Driver .exe for Windows
Drivers for Mac OS X: FTDI VCP Driver .dmg for Mac
Drivers for Linux are included in the OS kernel distribution.
Installation: double-click the .exe (Windows) or the .dmg(Mac OS X) file and follow the instructions.
Step 2
Download and install the latest Wiring development environment for your platform, Windows, Mac or Linux.
Windows users: double click and extract the wiring-00xx.zip file to a desired location.
Mac users: the wiring-00xx.dmg file will open automatically, drag the Wiring application into the Applications folder as suggested in the screen.
Linux users: double click and extract the wiring-00xx.tgz file to a desired location.
Step 3
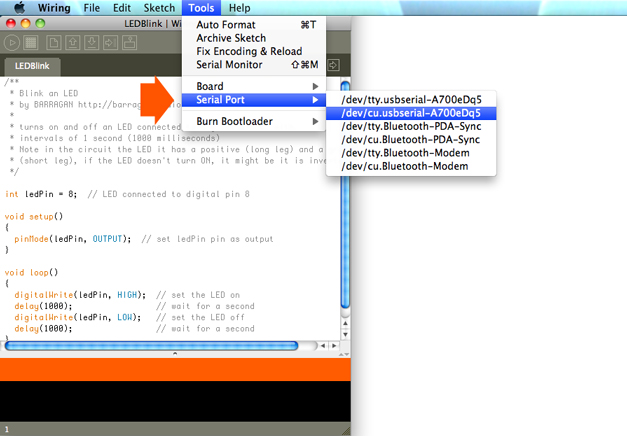
Serial Port Setup. Launch the Wiring development environment. In the Tools menu there is an option named Serial port, inside there is a list of the serial ports available. If everything went fine with the drivers' installation there should be a new port for the Wiring hardware. For Windows it appears as COMx where x could be 1,2,3,... etc. For Mac OSX ports appear as /dev/cu.usbserial-xx where xx is a number as well. Select the appropriate one and now you'll be able to upload any code into the board. Íf you don´t know which one corresponds with the Wiring hardware try to unplug the board from the USB port, check the menu (now there should be a missing port in the menu), plug the board back the the USB port and check the menu again (the board port will appear). Once the port is selected it will be the default port for the I/O board. The port will not change within restarts in the Wiring development environment, unless you connect the board to a different USB port on your computer, in this case the port number may change.
Note: This step needs to be repeated when the Wiring hardware is connected to a different USB port, or changing or connecting a different board.
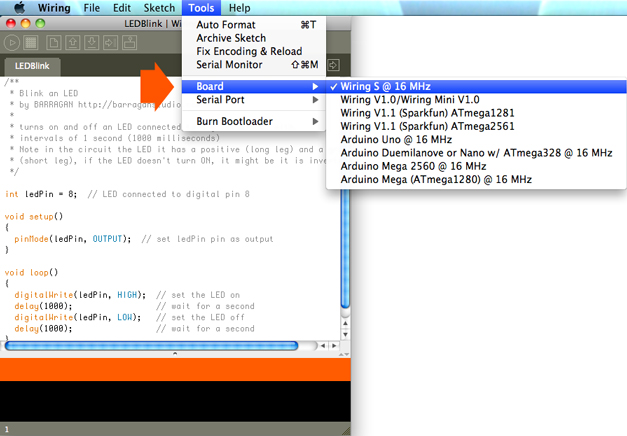
Step 4
Board selection. In the Tools menu there is an option named Boards, inside there is a list of Wiring boards and third party boards like Arduino. Select your board.